https://wiki.whirled.club/wiki/Simple_avatar_(Flash_tutorial)
https://web.archive.org/web/20091216122729/http://wiki.whirled.com/Advanced_avatar_(Flash_tutorial)
Persistent Memory Tutorial (WIP)
https://web.archive.org/web/20090207235047/http://wiki.whirled.com/Lamp_Toy_Tutorial
https://web.archive.org/web/20090421160158/http://wiki.whirled.com/Category:Tutorials
https://www.whirled.club/#groups-f_6
https://www.whirled.club/#groups-f_4 https://www.whirled.club/code/asdocs/ https://www.whirled.club/#groups-t_322https://www.dropbox.com/sh/78xncjyat26qrmu/AACQQ5rsBvGzwPqWkL5DVKqBa?dl=0
https://www.whirled.club/#people-23
https://www.whirled.club/#support Support Area: Creator Verification
Favorite the base avatar, upload your avatar, List Item, under Attribution select the avatar you favorited
These tips are based on CS3. The placement of options may differ in different versions of Flash.
Press F5 to insert a frame at your current spot in the timeline. If you click on a single frame in the timeline and press F5, then it'll insert another frame without changing any of the other parts of the timeline. If you click on the frame number above the layers and press F5, then it'll insert a frame on each layer for that part of the timeline. If you click on the layer name and press F5, then it'll double the number of frames for that layer.
Press F6 to create a new keyframe. If there is a drawing on your current frame already then it'll make another frame with a duplicate of the drawing. It won't insert a new frame unless you are at the last frame of the timeline. It otherwise behaves similarly to F5.
Press F7 to create a new blank keyframe. It's similar to F6 but always creates a keyframe with nothing in it.
Press F8 to create a new symbol. A drawing or some other object needs to be selected first to create a symbol with F8. You have some options for what type of symbol it makes, but for normal animation purposes, select movie clip. Double click on your symbol to edit it, and then click the back button above the stage to go back to the main timeline. You can create nested symbols (symbols of symbols) to suit the needs of your animation.
Press the < and > keys (the , and . keys) to go backwards and forwards in the timeline.
If there's a certain menu option you use a lot (such as Modify > Transform > Flip Horizontal), you can add a custom shortcut in Edit > Keyboard Shortcuts. You can select a menu command and then do the key stroke or key combination you want to use that command.
Click on the scene 'main' and press F9 to see the main avatar code. If there is no scene window, go to Window > Other Panels > Scene, or press Shift + F2.
The default avatar code is in the sample avatar file in the Whirled SDK.
Double click the 30.0 fps under the timeline. Here you can adjust width and height, as well as the background color. If you change the height, you will need to adjust the hotspot y value.
In the main avatar code, _ctrl.setHotSpot(130, 370); controls the positioning of the avatar. The first value is the horizontal positioning, the second value is the vertical positioning.
To see what values you should use for hotspot, open the Info window (Window > Info or Ctrl + I), hover your cursor to the center bottom of the avatar, the Info window will show the x and y values
Select brush tool, go to Properties window (Window > Properties > Properties or Ctrl + F3), adjust Smoothing, default 50, lower value is more crusty and less auto correct, higher value is smoother
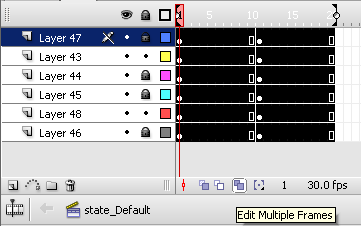
Unlock all layers you want to modify, select anything on frame 1, click Edit Multiple Frames, drag the right arrow at the top of the timeline to the last frame, click the first frame on the top layer, hold shift, and click the last frame on the bottom layer, Ctrl + A to select everything, you can now move/resize/recolor everything at once

Use onion skin, 2 buttons left of edit multiple frames button
Use < and > keys to toggle between frames
Method 1: if the drawing is not a Symbol, insert keyframes, change the color on one or more keyframes, right click between them and select Create Shape Tween
Method 2: if the drawing is a Symbol, insert keyframes, go to one keyframe, click on the symbol, go to Filters (next to Properties, or Window > Properties > Filters), click the plus sign, select Adjust Color, adjust sliders to change color, right click between keyframes and select Create Motion Tween
Method 2 can also be used for adding blur and glow by selecting a different option under the plus sign
Import image into stage, select image, Bitmap > Trace Bitmap, adjust settings to affect detail and color
_ctrl.setMoveSpeed(n);
The default move speed is 500. Lower numbers are slower and higher numbers are faster.
_ctrl.setHotSpot(x, y);
state_Default_towalking
state_Default_fromwalking
Default_to_Dancing
Dancing_to_Default
state_Default_tosleeping
state_Default_fromsleeping
This is used for blinking, where the blinking state is on the 05 layer, and non blinking state is on the 95 layer
state_Default_01:95
state_Default_02:05